Battery switch on travel trailer function is crucial for managing your RV’s power. Understanding how your battery switch works is key to preventing electrical issues and maximizing your off-grid adventures. This guide covers everything from basic functionality and installation to troubleshooting tips and advanced configurations, ensuring you’re well-equipped to handle any power situation on the road.
We’ll explore different battery switch types, their wiring, and how they interact with other trailer systems like solar panels and your tow vehicle’s charging system. Learn how to safely switch between power sources, maintain your batteries, and troubleshoot common problems. By the end, you’ll be a battery switch pro!
Understanding Battery Switch Functionality in Travel Trailers
A battery switch is a crucial component in a travel trailer’s electrical system, acting as a central control point for managing power flow from your batteries. Understanding its function and proper installation is essential for safe and reliable operation of your trailer’s appliances and systems. This section will cover the purpose, types, wiring, and installation of battery switches in travel trailers.
Battery Switch Purposes
The primary purpose of a battery switch in a travel trailer is to disconnect the house batteries from the rest of the electrical system when not in use. This prevents unwanted drain on the batteries, which can lead to a dead battery and leave you stranded. Additionally, a battery switch can isolate batteries during maintenance or repairs, ensuring safety and preventing accidental shorts.
A dual battery system, often seen in larger travel trailers, allows the switch to select between different battery banks (such as a starting battery and a house battery) or to combine them for increased power output.
Types of Battery Switches
Several types of battery switches are commonly used in travel trailers, each with its own advantages and disadvantages. Single battery switches are the simplest type, controlling only one battery bank. Dual battery switches manage two separate battery banks, often used for starting and house batteries. Selector switches offer more control, allowing you to select between different battery banks, combine them, or completely disconnect the batteries from the system.
Some advanced switches even incorporate features like remote control or digital displays.
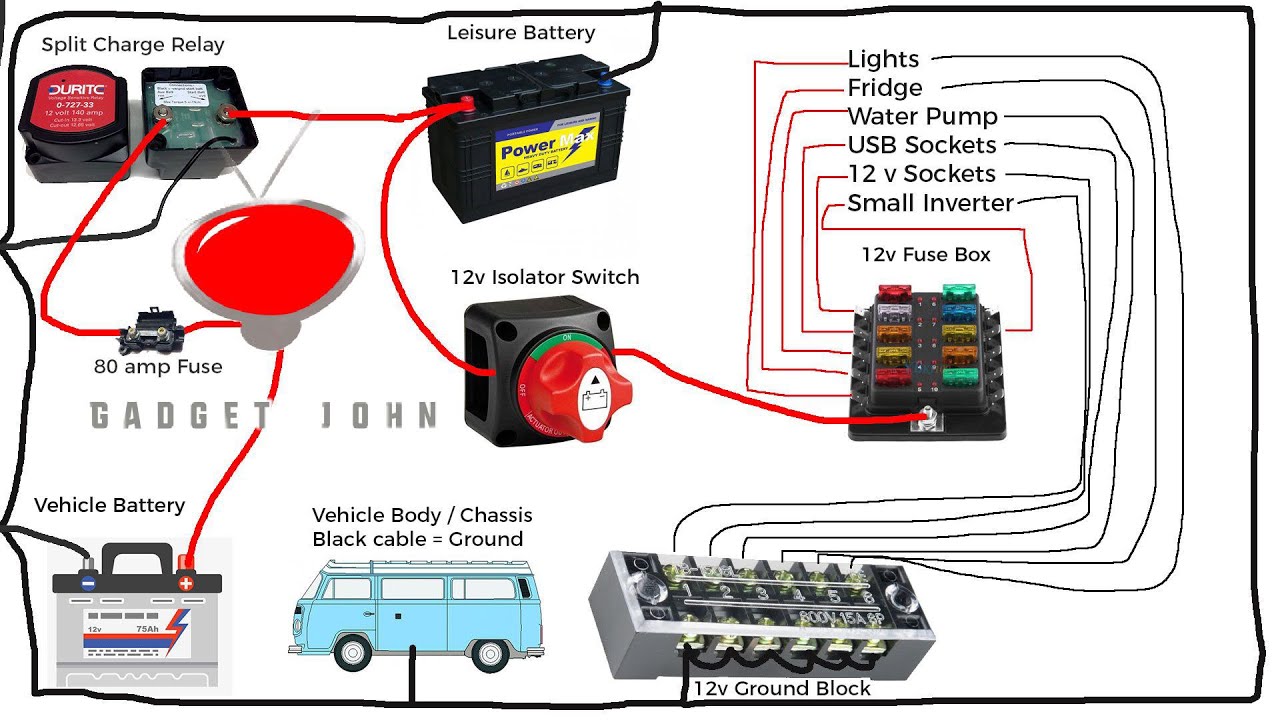
Typical Wiring Configuration
The wiring configuration for a battery switch system depends on the type of switch and the number of batteries involved. A typical dual battery system would involve two batteries, each connected to its own terminal on the switch. The output of the switch then feeds into the trailer’s 12V distribution panel, supplying power to the various appliances and accessories.
Properly sized wiring and fuses are essential to prevent overheating and damage. Always refer to the manufacturer’s instructions for the specific wiring diagram for your switch. Incorrect wiring can lead to serious electrical problems, including fires.
Battery Switch Installation Guide
Installing a battery switch requires some basic electrical knowledge and experience. If you’re not comfortable working with electrical systems, it’s best to consult a qualified professional. Improper installation can lead to dangerous situations. Always disconnect the negative battery terminal before starting any work on the electrical system.
| Step Number | Action | Tools Required | Safety Precautions |
|---|---|---|---|
| 1 | Disconnect the negative battery terminal. | Wrench | Always disconnect the negative terminal first to prevent accidental shorts. |
| 2 | Mount the battery switch in a secure and accessible location. | Screwdriver, Drill (possibly), Mounting Hardware | Ensure the location is dry and well-ventilated. |
| 3 | Connect the positive battery cables to the appropriate terminals on the switch. | Wrench, Wire Connectors | Ensure all connections are tight and secure. Use appropriate sized wire connectors. |
| 4 | Connect the output of the switch to the 12V distribution panel. | Wrench, Wire Connectors | Use appropriately sized wire and fuses. |
| 5 | Connect the negative battery cables to the chassis ground. | Wrench, Wire Connectors | Ensure a good ground connection to prevent electrical issues. |
| 6 | Reconnect the negative battery terminal. | Wrench | Test the switch to ensure it functions correctly. |
| 7 | Test the switch operation. | Multimeter (optional) | Verify that the switch correctly connects and disconnects the battery. |
Troubleshooting Common Battery Switch Issues
Your travel trailer’s battery switch is a crucial component, ensuring you can easily switch between your trailer’s battery and your tow vehicle’s charging system. Problems with this switch can leave you stranded without power. Understanding how to troubleshoot these issues is essential for maintaining your RV’s functionality.Let’s delve into the most common problems and how to fix them.
Common Battery Switch Problems and Their Causes
Several issues can arise with your battery switch, leading to power problems. Corrosion buildup on the terminals is a frequent culprit, hindering the flow of electricity. Loose connections, either at the switch itself or the battery cables, can also cause intermittent or complete power failure. Finally, the switch itself might simply be faulty, requiring replacement.
Troubleshooting Steps for a Non-Functional Battery Switch
Before you start, always disconnect the negative (-) battery cable to prevent accidental shorts and shocks. This is a crucial safety precaution.
So, you’re planning a trip? Awesome! First things first: get yourself sorted with travel insurance. Check out Aon travel insurance for solid coverage. Then, if you’re an audiophile like me, don’t forget your tunes! Seriously, planning your audiophile travel setup beforehand is key to a blissful journey. You wouldn’t want to be stuck with tinny earbuds on that once-in-a-lifetime adventure, would you?
- Inspect the Switch and Connections: Carefully examine the battery switch for any visible signs of corrosion, damage, or loose wiring. Look closely at the terminals and cable connections. Corrosion often appears as a white, green, or blue powdery substance.
- Clean the Terminals and Connections: If you find corrosion, use a wire brush or sandpaper to clean the terminals and cable ends until they are shiny and clean. Apply a corrosion inhibitor to prevent future buildup. This is usually a grease-like substance specifically designed for battery terminals.
- Tighten Connections: Ensure all connections are securely tightened. Loose connections are a common cause of intermittent power issues. Use a wrench to tighten the nuts and bolts on the terminals and cables.
- Test the Switch: Try switching the battery switch to different positions to see if it is operating mechanically. If the switch feels stiff or doesn’t move freely, it may indicate internal damage.
- Check the Circuit Breaker: Make sure the circuit breaker for the battery switch hasn’t tripped. If it has, reset it. If it trips immediately again, there’s a short circuit somewhere in the system that needs addressing.
Diagnosing Issues with a Multimeter
A multimeter is invaluable for diagnosing electrical problems. It allows you to measure voltage and continuity, helping pinpoint the exact location of the fault.
- Voltage Measurement: With the switch in the “on” position, measure the voltage at the battery terminals. You should read a voltage close to the battery’s rated voltage (typically 12V for a 12V battery). A low voltage reading indicates a problem in the charging system or a faulty battery. A reading of zero volts indicates a complete break in the circuit.
- Continuity Test: With the switch in the “on” position, use the multimeter’s continuity test function to check for continuity between the battery terminals and the switch terminals. A continuous beep indicates a good connection. No beep indicates a break in the circuit, which could be due to a faulty switch, corroded terminals, or a broken wire.
Troubleshooting Guide
| Problem | Possible Cause | Testing Method | Solution |
|---|---|---|---|
| No power to appliances | Corroded terminals | Visual inspection, voltage measurement at terminals | Clean terminals, apply corrosion inhibitor |
| Intermittent power | Loose connections | Visual inspection, tighten connections | Tighten all connections securely |
| No power, even with clean terminals | Faulty battery switch | Continuity test across switch terminals | Replace the battery switch |
| Low voltage at appliances | Faulty battery or charging system | Voltage measurement at battery | Check battery charge, inspect charging system |
Battery Switch and its Relationship to other Trailer Systems
Your battery switch isn’t just a simple on/off switch; it’s a crucial component that manages power flow throughout your travel trailer, influencing how various systems interact. Understanding its role in this power network is vital for efficient and safe operation. This section will explore the battery switch’s relationship with your trailer’s charging system and various appliances.
Battery Switch and Charging System Interaction
The battery switch acts as the gatekeeper for power entering and leaving your trailer’s batteries. When the switch is in the “on” position, it allows the charging system (solar panels, alternator, shore power converter) to charge the house batteries. With the switch off, the charging system is disconnected from the batteries, preventing any accidental drain or charging. This is particularly important for preventing battery drain when your trailer is in storage or not connected to shore power.
For example, if your solar panels are charging while the switch is off, no power will reach the batteries. Conversely, if the switch is on and the alternator is charging while driving, this charge goes directly to your house batteries.
Battery Switch Impact on 12V and 120V Appliances
The battery switch directly affects the operation of 12V appliances (like interior lights, water pumps, and fans). With the switch in the “off” position, these appliances won’t function. 120V appliances (air conditioners, microwaves) are usually powered by the converter, which draws power from the house batteries. However, the battery switch will often need to be on to allow the converter to draw power from the batteries, meaning that without it being switched on, the 120V appliances will not work.
A key exception is when shore power is connected; in this case, the 120V appliances typically run directly from the shore power and are less dependent on the battery switch’s position.
Comparison of Different Battery Switch Types
Different battery switch types offer varying levels of control and protection. Simple on/off switches are the most basic, while more advanced switches offer features like battery combining and disconnect capabilities for safety. Understanding these differences is key to selecting the right switch for your needs and trailer setup.
Battery Switch Type Comparison
| Switch Type | Features | Pros | Cons |
|---|---|---|---|
| Simple On/Off | Basic on/off functionality | Simple, inexpensive | Limited functionality, no battery isolation |
| Dual Battery Switch | Separate control for two battery banks | Allows independent management of battery banks (e.g., house and starting batteries) | More complex than a simple switch |
| Battery Isolator | Automatically connects and disconnects batteries based on voltage | Prevents deep discharge, protects against parasitic drain | Can be more expensive |
| Smart Battery Switch | Combines features of dual battery switches and battery isolators with additional monitoring and control | Provides comprehensive battery management, often with remote monitoring capabilities | Most expensive option |
Safety Considerations with Travel Trailer Battery Systems: Battery Switch On Travel Trailer Function
Working with batteries, especially in a confined space like a travel trailer, requires caution. Improper handling can lead to serious injury or damage to your equipment. Understanding safe procedures and preventative measures is crucial for a safe and enjoyable RVing experience. This section Artikels essential safety practices to ensure you’re handling your travel trailer’s battery system responsibly.
Safe Procedures for Connecting and Disconnecting Batteries
Before working with your batteries, always wear appropriate safety gear. This includes safety glasses to protect your eyes from potential splashes of battery acid and gloves to protect your hands from corrosion and acid burns. Disconnect the negative (-) terminal first when removing a battery and reconnect it last when installing a battery. This prevents accidental short circuits that could cause sparks, fire, or injury.
When disconnecting, use a wrench specifically designed for battery terminals to avoid damaging them. Always ensure the area is well-ventilated to avoid inhaling potentially harmful fumes. Never work on batteries near open flames or sparks.
Preventing Battery Corrosion and Maintaining Safe Connections
Battery corrosion is a common problem that can lead to poor connections and reduced battery performance. Regular cleaning and maintenance can prevent this. Use a wire brush or baking soda paste to clean the terminals and posts, removing any white, powdery corrosion. Apply a battery terminal protector to prevent future corrosion and ensure a good connection. Tighten all connections securely but avoid over-tightening, which could damage the terminals.
Inspect the battery cables regularly for any signs of damage, fraying, or cracks and replace them immediately if needed.
Potential Hazards Associated with Improper Battery Handling
Improper handling of batteries can lead to several serious hazards. Battery acid is highly corrosive and can cause severe burns to skin and eyes. Hydrogen gas, produced during battery operation, is highly flammable and can ignite if exposed to a spark or flame. Incorrect connections can lead to short circuits, causing sparks, fire, and potentially explosions. Inhaling battery fumes can also be harmful to your health.
Always handle batteries with care and follow all safety precautions. A simple mistake can result in serious injury or property damage. For example, accidentally dropping a battery could lead to acid spillage, requiring immediate cleanup and potential medical attention.
So, you’re planning a trip? Awesome! First things first: get yourself sorted with travel insurance. Check out Aon travel insurance for some solid options; peace of mind is priceless. Then, if you’re an audiophile like me, don’t forget your tunes! Setting up your audiophile travel setup beforehand is key for a truly enjoyable journey.
Think portable DAC, noise-cancelling headphones – the works! Enjoy your trip!
Safety Features of Different Battery Switch Types, Battery switch on travel trailer function
Different battery switches offer varying levels of safety features. Understanding these features is important for selecting the right switch for your needs.
- Standard Battery Switches: These switches simply disconnect or connect the batteries. They lack sophisticated safety features beyond the inherent protection offered by properly rated wiring and fuses.
- Automatic Battery Switches: These switches automatically switch between batteries based on the voltage level, ensuring you always have power. Some models include low-voltage disconnect features to prevent deep discharge and protect your batteries. This adds a layer of safety against damage from over-discharge.
- Remote Battery Switches: These allow you to control the battery connection from a convenient location, such as inside your RV, reducing the need to handle the battery directly. This improves safety by minimizing direct contact with the battery.
- Battery Isolators: These devices prevent the batteries from discharging each other. They allow for charging both batteries simultaneously without draining one to power the other. This prevents unexpected power loss.
Advanced Battery Switch Configurations and Upgrades

Upgrading your travel trailer’s battery system beyond a simple switch can significantly improve power management and reliability. This section explores more complex configurations and the benefits they offer for extended camping trips or those with high power demands. We’ll look at multiple battery banks, advanced management systems, and integrating battery monitors for complete control.Multiple battery banks, controlled by a sophisticated switching system, offer increased capacity and the ability to isolate different battery types (like lead-acid and lithium).
This allows for dedicated power sources for essential functions, even if one bank fails. However, this added complexity increases installation costs and requires a more thorough understanding of electrical systems.
Multiple Battery Bank Systems
Using multiple battery banks allows for the separation of house and starting batteries. This ensures that even if your house batteries are depleted, you’ll still have enough power to start your vehicle’s engine. A common configuration involves two banks: one for starting and one for house power. A more advanced system might add a third bank for solar charging or a dedicated deep-cycle battery for high-drain appliances.
The advantages include increased capacity, improved system reliability due to isolation, and the ability to use different battery chemistries optimized for different needs (e.g., deep cycle for house use, cranking for starting). However, the drawbacks are the increased cost of batteries, wiring, and the sophisticated switching system required to manage them. Properly sizing the batteries and selecting an appropriate switching system is critical for optimal performance and safety.
Installing an Advanced Battery Management System
An advanced battery management system (BMS) goes beyond a simple switch, providing monitoring, protection, and intelligent power distribution. Installation typically involves connecting the BMS to each battery bank and integrating it with the trailer’s wiring harness. This requires careful planning and adherence to electrical codes. The BMS monitors voltage, current, and temperature of each battery, preventing overcharging, over-discharging, and overheating.
It can also automatically prioritize power distribution to essential systems during low-power situations. The process begins with careful planning, identifying the appropriate BMS for your system’s needs, and then following the manufacturer’s instructions for wiring and configuration. This often involves connecting shunt sensors to measure current draw and voltage sensors to monitor battery health. Finally, the BMS is typically connected to a display unit for monitoring.
Integrating a Battery Monitor
A battery monitor provides real-time information about the state of your battery banks, including voltage, current, state of charge (SOC), and remaining capacity. Integrating a battery monitor involves connecting it to the positive and negative leads of each battery bank via appropriately sized shunt resistors. The monitor then displays this information on a digital screen, providing a clear picture of your power usage and remaining battery life.
This allows for informed decisions about power consumption and helps prevent unexpected power outages. Choosing a monitor with appropriate voltage and current ratings for your system is crucial for accurate readings. Accurate readings are essential for effective power management. The installation usually involves running wires from the battery banks to the monitor’s display unit, ensuring proper grounding and connection to the trailer’s electrical system.
A Complex Battery System Diagram
Imagine a diagram showing three battery banks: a starting battery (Group 31 lead-acid), a house battery bank (two 6V golf cart batteries in series for 12V), and a lithium-ion battery bank (two 12V lithium batteries in parallel for 12V, higher capacity). Each bank is connected to a sophisticated battery combiner/switch that allows for independent charging, isolation, and combining of the banks.
The starting battery is directly connected to the vehicle’s starting system. The house battery bank powers the trailer’s interior lights, appliances, and other 12V devices. The lithium-ion bank is dedicated to high-drain appliances and can receive power from a solar panel system. A battery monitor is connected to all three banks, displaying their individual states of charge and overall system voltage.
A large, clear wiring diagram would accompany this visual representation, illustrating all connections and protective devices (fuses, circuit breakers). The combiner/switch would be the central element, allowing the user to select which banks are connected or isolated, and potentially prioritising the flow of energy between banks to prevent over-discharge.
Mastering your travel trailer’s battery switch is about more than just turning power on and off; it’s about understanding your RV’s electrical system and keeping it running smoothly. From simple maintenance to advanced configurations, this guide has equipped you with the knowledge to confidently manage your power sources, troubleshoot problems, and enjoy worry-free RVing. Happy travels!
Helpful Answers
What happens if I accidentally leave the battery switch in the wrong position?
Depending on the position, you might drain your batteries, or prevent them from charging. Always double-check the switch position before leaving your trailer unattended.
How often should I check my battery connections?
At least once a month, inspect for corrosion and tighten loose connections. Regular checks prevent problems before they become major issues.
Can I use a battery switch with a lithium battery bank?
Yes, but you’ll need a switch specifically designed for lithium batteries, as they have different voltage and charging requirements.
My battery switch is making clicking noises. What could be wrong?
This often indicates a faulty switch, loose connections, or low battery voltage. Check the connections and voltage first; if the problem persists, replace the switch.
